Easy Scrap Fabric Crochet Potholder Pattern for Beginners
Soft cotton fabric strips turn into a thick, textured potholder with a sturdy feel and a handmade look that suits a farmhouse kitchen or a colorful apartment. This project gives useful scraps a second life, and it is satisfying to watch the rows build into a firm square you can hold in your hand. Beginners can practice keeping their stitches even, while experienced crocheters can enjoy a quick make between larger projects. It also makes a thoughtful housewarming gift when you choose fabric in colors the recipient uses at home. You’ll learn how to prepare the fabric strips as a continuous working strand and crochet them into dense rows using single crochet. The finished piece is best made with cotton fabric, since synthetic fibers can melt near heat. A simple border tidies the edges and gives the potholder a clean finish.
Why You’ll Love This Pattern
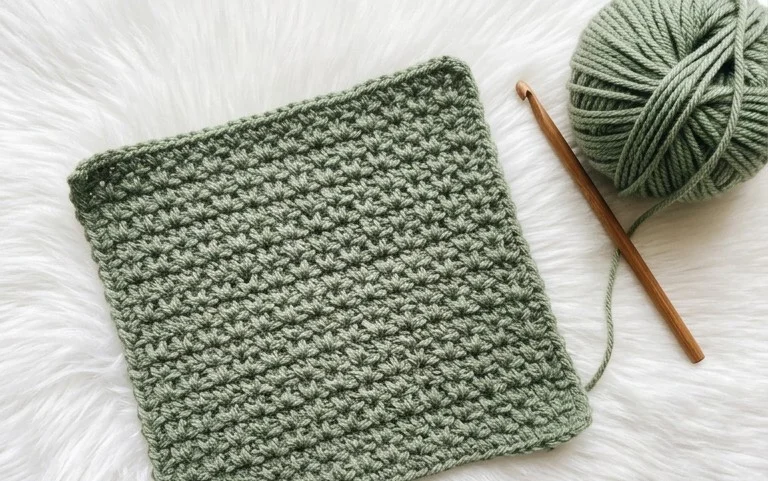
A firm cotton stitch makes this crochet dishcloth useful for wiping counters, washing dishes, or keeping beside the sink. The pattern uses single crochet in rows, with every other row worked through the back loop to add a subtle ribbed texture. You can finish it with one skein of cotton yarn and basic supplies.
The rectangular shape is straightforward to track, and the repeating rows make this a practical project for practicing even tension. It also works well for leftover cotton yarn, as long as you have enough for the full cloth. Choose a washable cotton in a color that suits your kitchen, or make several matching cloths for a useful handmade gift.
The rows were easy to remember, and the back-loop texture feels nice in my hand. I finished mine in an evening and have already made a second one.
— Jo, sample crocheter
Pattern Overview & Skill Level
- Skill Level: Beginner. You need to chain, single crochet, and recognize the back loop.
- Approximate Time: About 2 to 3 hours, depending on your pace and how often you stop to check your stitches.
- Construction: The dishcloth is worked flat in rows from the lower edge upward. There is no shaping or seaming.
- Finished Dimensions & Sizing: About 8.5 inches wide by 7.5 inches tall after washing and drying flat, using the gauge below. Small differences in tension will change the final size.
Gauge: 14 single crochet stitches and 16 rows measure 4 inches square in the main fabric. Make a small swatch if you want to check your tension. If your swatch is wider than 4 inches, try a smaller hook; if it is narrower, try a larger one.
Materials & Supplies Needed
- Yarn: About 75 to 90 yards of worsted-weight (#4) 100% cotton yarn. One solid color is enough; cotton is absorbent and handles frequent washing well.
- Hook Size: 5.0 mm / H-8 crochet hook. Use the hook that gives you the stated gauge, even if you need to go up or down a size.
- Notions: Tapestry needle for weaving in the ends, scissors, and a ruler or tape measure for checking gauge.
- Substitutions: A different worsted-weight cotton can work, though a thicker or thinner yarn will change the finished dimensions and may need a different hook. Avoid acrylic for a dishcloth intended to absorb water. If you use a cotton blend, check its care label and expect the texture and absorbency to differ.
Stitch Guide & Abbreviations (US Terms)
- ch: Chain.
- sc: Single crochet. Insert the hook in the indicated stitch, yarn over and pull up a loop, yarn over and pull through both loops on the hook.
- BLO: Back loop only. Work the stitch through the loop farthest from you at the top of the stitch. Leave the front loop unworked.
- st(s): Stitch or stitches.
- RS: Right side, the face of the fabric you choose to display.
- WS: Wrong side, the opposite face of the fabric.
The turning chain at the start of each row does not count as a stitch. Work the first single crochet into the first stitch of the row, directly beside the turning chain.
Step-by-Step Pattern Instructions
Dishcloth
- Foundation: Ch 31. The foundation chain sets up 30 stitches, with one chain left for turning.
- Row 1 (RS): Sc in the second ch from the hook and in each ch across. Ch 1 and turn. (30 sts)
- Row 2 (WS): Sc in BLO across. Ch 1 and turn. (30 sts)
- Row 3 (RS): Sc in each st across, working under both loops. Ch 1 and turn. (30 sts)
- Rows 4–30: Repeat Rows 2 and 3 thirteen times, then work Row 2 once more. Each row has 30 sc. After Row 30, fasten off and leave a tail long enough to weave in securely. (30 sts per row)
Finishing
Thread the yarn tail onto a tapestry needle. Weave it through the stitches on the wrong side for about an inch, change direction, and weave through a few nearby stitches so the end is less likely to work loose during washing. Secure the starting tail in the same way, then trim both ends close to the fabric without cutting a stitch.
Lay the cloth flat and measure it without stretching. A small difference from the listed size is normal. If the edges curl, wash the cloth according to the yarn label, smooth it into a rectangle while damp, and let it dry flat.
Care & Washing Instructions
- For 100% cotton yarn, machine wash with similar colors in cool or warm water, up to 40°C (104°F), unless the yarn label gives different directions.
- Dry flat for the neatest shape, or tumble dry on low only if the yarn label allows it.
- While damp, smooth the cloth back into a rectangle; block lightly if needed, following the yarn label.
Pro Tips & Common Mistakes to Avoid
- Keep your foundation chain relaxed. A tight chain can pull the lower edge inward; if that happens often, use a hook one size larger for the chain only.
- Count the stitches at the end of each row. It is easy to miss the last stitch beside the turning chain, which can make the cloth narrower as you work.
- Check that each textured row goes through the back loop only. On the following row, work under both loops to keep the ribbed pattern consistent.
- For a larger cloth, add stitches to the foundation chain and add pairs of rows to keep the texture repeat. More stitches and rows use more yarn; make a small gauge swatch first if you need to estimate the new yardage.
Frequently Asked Questions
Can I use acrylic yarn for this dishcloth?
You can crochet the pattern in acrylic, but the fabric will generally absorb less water and may feel different from cotton. For a working dishcloth, choose washable cotton and follow the yarn label for laundering.
How do I make the dishcloth smaller or larger?
For a narrower cloth, start with fewer chains while keeping one chain for turning. For a wider cloth, add chains. Adjust the number of rows to change the height. Both changes affect yarn use and finished dimensions, so measure as you go.
Is this pattern suitable for a beginner?
Yes. It uses chain and single crochet, with one row type worked through the back loop. If you are new to crochet, count each row and check that you still have 30 stitches before turning.
Can I sell dishcloths made from this pattern?
Check the designer’s terms for any restrictions on selling finished items, and follow applicable labeling and safety rules. If you sell your work, describe the fiber accurately and give buyers the yarn’s care instructions.
Your finished potholder turns leftover cotton into a useful kitchen piece with a firm surface and a bit of handmade texture. Trim any loose fabric threads and check the edges before putting it to work; if you plan to use it with hot cookware, make sure its thickness suits the job and keep it away from open flames. For a simple variation, use fabric scraps in two colors and alternate them every few rows for clear bands. Once yours is finished, share a photo on Pinterest or your favorite social platform so other makers can see how your fabric colors came together. You can also explore more free crochet patterns on the blog for another small project to make with materials you already have.